To create a perfect spade-cut natural edge, start by gathering a sharp spade, gloves, and a garden fork. Clear the area of debris and mark your desired line with a hose or string. Position the spade at a 45-degree angle against the marked line and push down to cut a clean edge, maintaining a depth of 4 to 6 inches. Smooth out your work, and if you want to learn about enhancing your garden further, keep exploring techniques!
Key Takeaways
- Clear the area of debris and trim vegetation to establish a clean workspace for edging.
- Use a garden hose or string to outline the desired edge shape before cutting.
- Position the spade at a 45-degree angle and press down firmly for a clean cut.
- Maintain a consistent depth of 4 to 6 inches to ensure stability and prevent plant invasion.
- Finish by using pruning shears to tidy up any overhanging grass or plants along the edge.
Understanding the Basics of Spade-Cut Edging
When you’re looking to create a natural edge in your garden, understanding the basics of spade-cut edging is essential. This technique involves using a spade to define the boundary between your garden beds and lawn.
To start, you’ll need to identify where you want the edge to be. Then, push the spade into the soil at an angle, cutting a clean line. Aim for a depth of about 4 to 6 inches to ensure stability. For a cleaner and more precise edge, using pruning shears to trim back any overhanging grass or plants along the edge can make a noticeable difference.
As you work, remove any grass or weeds that encroach on the garden bed. This method not only gives your garden a polished look but also helps prevent grass from invading your plants.
Using essential weeding tools alongside your spade can make the process even more efficient and keep your garden beds tidy as you create the edge.
With practice, you’ll achieve a beautiful, natural edge that enhances your garden’s appeal.
Choosing the Right Tools for the Job
Creating a natural edge requires not just technique but also the right tools to make the process smoother and more effective. Start with a sharp spade, as a clean cut is crucial for a neat edge.
You’ll also need a garden fork to help loosen the soil if it’s compacted. A hand trowel can assist in shaping the edge and removing excess dirt. Don’t forget gardening gloves for protection and a kneeling pad for comfort while working. Using the right gloves keeps your hands safe from blisters and thorns, making your edging task much more comfortable.
If you’re dealing with dense roots, a root cutter or pruning saw might come in handy. Investing in quality tools ensures durability and better results, making your edging project enjoyable and efficient. For the best results, consider using essential garden shovels designed specifically for gardening tasks, as they provide the reliability and performance every gardener needs.
Choose wisely, and you’ll see the difference in your finished edge.
Preparing the Area for Edging
Before you start edging, it’s essential to prepare the area properly. A well-prepped space ensures your edging will look clean and professional.
Here are a few steps to follow:
- Clear debris: Remove any leaves, rocks, or other obstacles that might hinder your cutting.
- Trim vegetation: Cut back any grass or plants that are too close to the edge to create a clean workspace.
- Rake the soil: Level the soil and fill in any holes to ensure an even surface for your spade.
- Assess drainage: Check for any water pooling in the area, as this could affect the longevity of your edge.
If you need to water the soil before cutting the edge, using a flexible garden hose can make the job easier and help soften the ground for smoother spade cuts.
For best results, consider using essential edging tools to make the preparation and cutting process more efficient and precise.
Taking these steps will make the edging process smoother and yield better results.
Marking the Edging Line
One of the key steps in achieving a perfect spade-cut natural edge is marking the edging line accurately.
Start by determining where you want the edge to be, taking care to visualize the curve or straight line. Use a garden hose or string to outline your desired shape, allowing for adjustments as needed. Investing in essential gardening tool sets can make this process more efficient and ensure you have all the necessary equipment on hand.
Once you’re satisfied with the layout, grab a marking tool like spray paint or garden chalk to trace the outline. This will give you a clear reference for your cut.
Make sure the line is visible and distinct; it’ll guide you during the cutting process. Double-check your markings before moving forward to ensure everything’s aligned with your vision for that perfect edge.
For even more precision, consider using essential plant markers as a tool to mark reference points along your edging line, making sure your design stays true to your original plan.
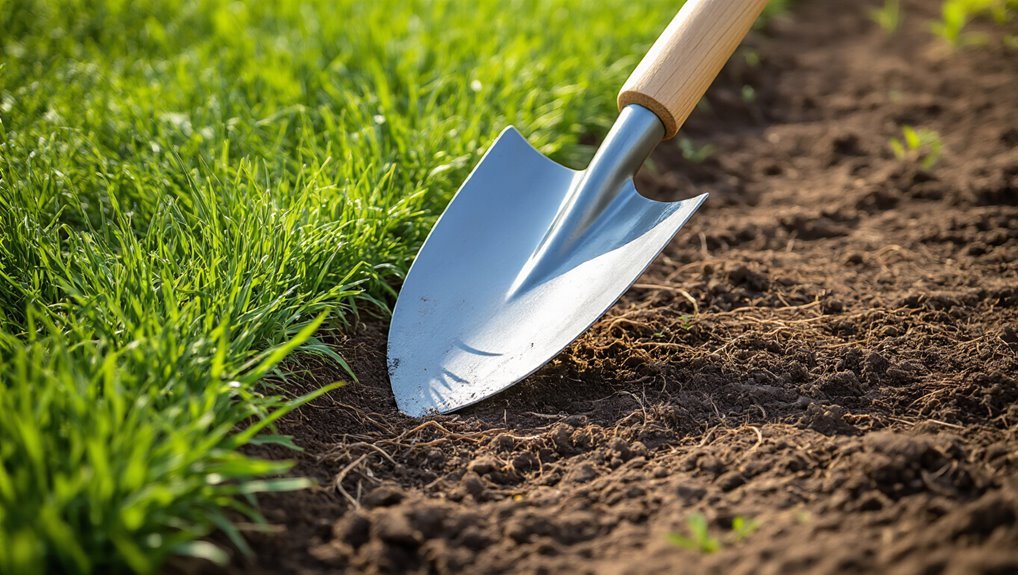
Executing the Spade-Cut Technique
Grab your spade and get ready to dive into the spade-cut technique. This method creates a clean, natural edge for your garden, and it’s easier than you think.
Follow these steps for an effective execution:
- Position your spade at a 45-degree angle against the marked line.
- Press down firmly, cutting through the soil and creating a defined edge.
- Move along the line in smooth, deliberate motions to maintain consistency.
- Adjust the depth of your cut as needed, ensuring you don’t disturb the surrounding plants.
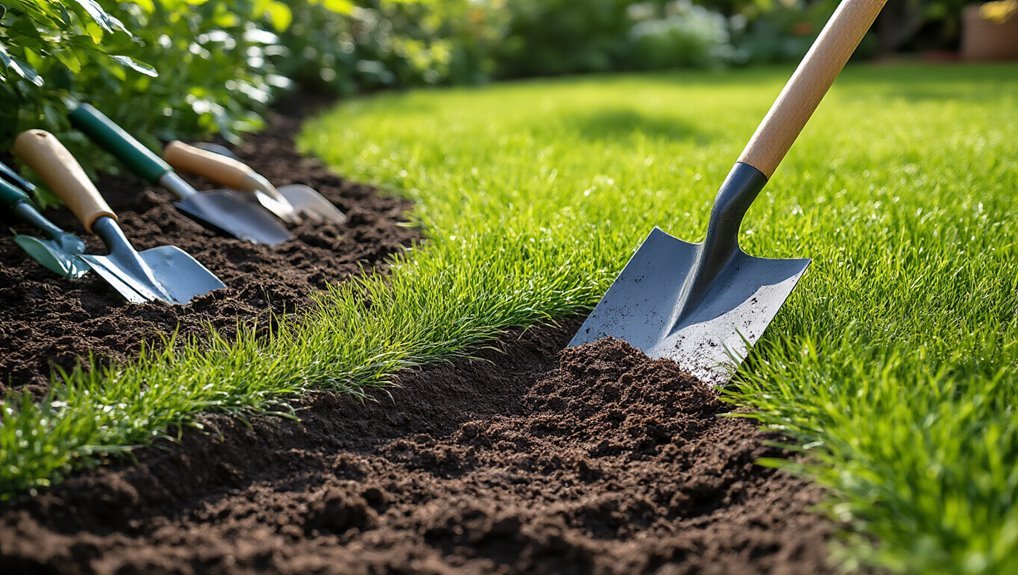
Removing Excess Soil and Debris
After you’ve executed the spade-cut technique, it’s time to clear away any excess soil and debris.
Start by gently scraping along the edge with your spade or a trowel. This helps expose the natural line you’ve created and removes any loose soil clinging to the edges. Be careful not to disturb the surrounding plants or the newly formed edge.
Next, gather any larger clumps of soil and debris, using a rake or your hands to keep the area tidy. If you notice any rocks or unwanted materials, remove those as well.
Finally, step back and assess your work. A clean edge not only enhances the look of your garden but also sets the stage for future maintenance.
Maintaining Your Natural Edge
To keep your natural edge looking sharp and defined, regular maintenance is essential. This ensures that your garden not only looks great but also stays healthy.
Here are some key maintenance tips to follow:
- Trim Overgrown Grass: Regularly cut back any grass encroaching on your edge to maintain its shape.
- Remove Weeds: Keep weeds at bay by pulling them out or applying appropriate weed control methods.
- Check for Erosion: Inspect your edge for any signs of erosion and address them promptly to prevent further damage.
- Reapply Mulch: Add a fresh layer of mulch as needed to keep the soil moist and deter weeds.
Enhancing Your Garden With Additional Features
While maintaining your natural edge is important, enhancing your garden with additional features can elevate its beauty and functionality.
Consider adding decorative stones or mulch to create defined pathways that guide visitors through your space. Incorporating garden art, like sculptures or wind chimes, adds a personal touch and draws attention. You might also plant seasonal flowers to introduce vibrant colors throughout the year.
Installing a small water feature, like a fountain or birdbath, not only beautifies the area but attracts wildlife, creating a lively atmosphere. Lastly, consider outdoor seating for relaxation, making your garden a welcoming retreat.
Frequently Asked Questions
Can I Use a Spade-Cut Technique on Rocky Soil?
Yes, you can use a spade-cut technique on rocky soil, but it might be challenging. You’ll need to apply extra force and possibly adjust your approach to navigate the rocks effectively during the cutting process.
How Deep Should the Spade Cut Be for Effective Edging?
You’d think a shallow cut would suffice, but for effective edging, aim for at least 3 to 4 inches deep. It’ll help create a clean line and keep those pesky weeds at bay!
Is Spade-Cut Edging Suitable for All Types of Plants?
Spade-cut edging isn’t suitable for all plants. While it works well for many perennials and annuals, delicate species might suffer from root disturbance. Always assess your garden’s specific needs before choosing this method.
What Is the Best Time of Year for Spade-Cut Edging?
The best time for spade-cut edging is during early spring or early fall. You’ll find the soil easier to work with, your plants thriving, and your garden looking neat and defined throughout the growing season.
How Long Does a Spade-Cut Edge Typically Last?
A spade-cut edge typically lasts for several seasons, depending on factors like soil type, moisture, and maintenance. With proper care, you can enjoy a clean, defined edge that enhances your garden’s appearance for years.
Conclusion
By mastering the art of spade-cut natural edging, you’re not just shaping your garden; you’re crafting a masterpiece that breathes life into your outdoor space. Each cut is like a brushstroke, defining beauty and inviting nature to dance at your feet. With a little effort and care, you’ll create a seamless border that enhances your garden’s charm. So grab your spade and let your creativity flow—your perfect edge awaits!


